Amy's Blog

notes


  • Home

  • Tags

  • Categories

  • Archives

  • Sitemap

  • Search

安卓下微信点击返回键popstate事件不能触发监听

Posted on 2021-04-23 | In Frontend前端 , weChatH5 | 0 comments | Visitors:

在做一个项目回退的功能的时候,用pushState添加一条历史记录,然后监听popState的回退功能,发现在安卓手机中增加了记录console.log(“当前浏览器记录”,window.history),当前的history.length长度是2,但是回退的话安卓手机直接退出微信的webview,然后测试滚动页面之后在回退依旧直接退出微信的webview,当点击一下页面空白位置或者交互一下发现,回退才触发popstate,
在安卓机中触发popstate监听有个条件就是必须和页面产生交互后才能触发。那我就通过js自动播放音频文件的方式让页面产生模拟交互。当然这个音频文件可以不用存在。

加入如下代码可以解决安卓部分机型(都说安卓的7.0.16未生效,但是我测试的生效了,所见的机型都可以应用)

1
2
3
4
5
6
7
if (UserAgent.env.android) {
try {
window.tbs_bridge.nativeExec('network', 'type', 0, null);
} catch (e) {
console.error(e);
}
}

HTML5 新API

history.pushState(state, title, url); 添加一条历史记录,不刷新页面
history.replaceState(state, title, url); 替换一条历史记录,不刷新页面

事件
popState事件:历史记录发生变化时触发,调用history.pushState()或history.replaceState()不会触发此事件

1
window.addEventListener('popstate', handlePopstate);

hashchange事件:页面hash值发生改变时触发

1
window.addEventListener('hashchange', handleHashChange);

关于部分安卓机使用手势返回/物理返回键监听不了的问题

上面的代码在IOS中是没有问题的,但是在调试的时候发现部分安卓尽然监听不了popstate;

关于此问题,微信社区也看到了,但是工作人员都没有给出一个满意的解决方案(直接搜一下popstate,会出现关于这个问题的讨论):

  • 公众号中监听popstate 事件在vivoY3手机中不执行?
  • 安卓手机测试发现至少需要手指点击页面任何部分之后返回才会触发popstate

然后也在网上搜一下这个问题(相关文章):

  • 微信内置浏览器返回键popstate事件监听不触发问题(安卓)

  • 很多安卓手机微信浏览器无法监听 popstate、hashchange 事件

  • https://www.520ym.net/xuexi/biji/9347.html

Rollup.js | 解决打包react项目报错

Posted on 2021-02-03 | In Frontend前端 , RollupJS | 0 comments | Visitors:

报错信息

1
2
3
4
5
react.development.js:12 Uncaught ReferenceError: process is not defined
at react.development.js:12
at createCommonjsModule (bundle.js:6)
at react.production.min.js:23
at index.js:10

process对象是nodejs的环境变量,浏览器端是没有的。
解决办法,在打包后的bundle.js里var一个process对象,例如

1
2
3
4
5
var process = {
env: {
NODE_ENV: 'production'
}
}

但是每次重新构建bundle.js后,又要重新添加,所以可以在rollup.config.js里配置,

例如:

1
2
3
4
5
6
7
8
9
10
11
12
13
14
15
16
17
18
19
20

import resolve from 'rollup-plugin-node-resolve'
import commonjs from 'rollup-plugin-commonjs'

const Global = `var process = {
env: {
NODE_ENV: 'production'
}
}`

export default {
input: pathResolve('src/index.js'),
output: {
name: 'bundle',
file: pathResolve("dist/js/bundle.js"),
format: 'iife',//immediately-invoked function expression — suitable for <script> tags
sourcemap: true,
banner: Global//output.banner属性的作用是在打包后的文件顶部添加值。
},
plugins: [resolve(), commonjs()]

或者rollup.config.js配置

1
2
3
4
5
6
7
8
9
10
11
12
13
14
15
16
17
18
19
20
21
22
import replace from "@rollup/plugin-replace";
export default {
input: pathResolve('src/index.js'),
output: {
name: 'bundle',
file: pathResolve("dist/js/bundle.js"),
format: 'iife',//immediately-invoked function expression — suitable for <script> tags
sourcemap: true,
},
plugins: [
resolve(), // tells Rollup how to find date-fns in node_modules

babel({
babelHelpers: "bundled",
exclude: "**/node_modules/**",
}),
commonjs(), // converts date-fns to ES modules
replace({
"process.env.NODE_ENV": JSON.stringify("development"),
}),
]
};

Rollup.js | 解决打包react项目报错

Posted on 2021-02-03 | In Frontend前端 , RollupJS | 0 comments | Visitors:

最近写了一个九宫格抽奖的一个react的组件,想着写都写完了,顺便在回顾下rollup打包一个组件,并且来发布出来。主要就用到了react 和rollup。rollup 适合打包 js 库,不适合打包 css,如果想制作 基于 react 和antd 的组件首选 webpack

一、初始化项目

1
2
3
mkdir lottery-react
cd lottery-react
npm init

我的package.json

1
2
3
4
5
6
7
8
9
10
11
12
13
14
15
16
17
18
19
20
21
22
23
24
25
26
27
28
29
30
31
32
33
34
35
36
37
38
39
40
41
42
43
44
45
46
47
48
49
50
51
52
53
54
55
56
57
58
59
60
61
62
63
64
65
66
67
68
69
70
71
72
73
74
75
76
77
78
79
80
81
82
83
84
85
86
{
"name": "lottery-react",
"version": "1.0.2",
"description": "lottery-react",
"main": "lib/index.js",
"module": "es/index.js",
"unpkg": "dist/lottery.min.js",
"files": [
"dist",
"lib",
"es"
],
"sideEffects": [
"dist/*",
"es/**/style/*",
"lib/**/style/*",
"*.scss"
],
"scripts": {
"clean": "rimraf lib es dist",
"build:cjs": "babel src --out-dir lib",
"build:es": "cross-env BABEL_ENV=jsnext babel src --out-dir es",
"build:umd": "cross-env BABEL_ENV=rollup NODE_ENV=development rollup -c -f umd -o dist/lottery.js",
"build:umd:min": "cross-env BABEL_ENV=rollup NODE_ENV=production rollup -c -f umd -o dist/lottery.min.js",
"build": "npm run clean && npm run build:cjs && npm run build:es && npm run build:umd && npm run build:umd:min",
"build:cjs2": "cross-env BABEL_ENV=rollup NODE_ENV=development rollup -c -f umd -o lib/index.js",
"build:es2": "cross-env BABEL_ENV=rollup NODE_ENV=development rollup -c -f umd -o es/index.js",
"build:all": "npm run clean && npm run build:cjs2 && npm run build:es2 && npm run build:umd && npm run build:umd:min",
"examples": "npm-run-all --parallel examples:watch examples:start",
"examples:clean": "rimraf example/dist",
"examples:start": "serve example/dist",
"examples:watch": "rollup -c example/rollup.config.js -w",
"examples:build": "rollup -c example/rollup.config.js"
},
"repository": {
"type": "git",
"url": "git+https://github.com/sailormillet/lottery-react.git"
},
"keywords": [
"Lottery",
"lucky draw",
"lotto",
"sweepstake",
"react"
],
"author": "Amy",
"license": "ISC",
"bugs": {
"url": "https://github.com/sailormillet/lottery-react/issues"
},
"homepage": "https://github.com/sailormillet/lottery-react#readme",
"peerDependencies": {
"react": "^0.14.0 || ^15.0.0 || ^16.0.0 || ^17.0.0",
"react-dom": "^0.14.0 || ^15.0.0 || ^16.0.0 || ^17.0.0"
},
"devDependencies": {
"@babel/cli": "^7.12.10",
"@babel/core": "^7.12.10",
"@babel/plugin-proposal-class-properties": "^7.12.1",
"@babel/preset-env": "^7.12.11",
"@babel/preset-react": "^7.12.10",
"@rollup/plugin-alias": "^3.1.1",
"@rollup/plugin-babel": "^5.2.2",
"@rollup/plugin-commonjs": "^17.0.0",
"@rollup/plugin-node-resolve": "^11.1.0",
"@rollup/plugin-replace": "^2.3.4",
"cross-env": "^7.0.3",
"fs": "^0.0.1-security",
"npm-run-all": "^4.1.5",
"path": "^0.12.7",
"postcss": "^8.2.4",
"postcss-cssnext": "^3.1.0",
"postcss-nested": "^5.0.3",
"postcss-preset-env": "^6.7.0",
"react": "^17.0.1",
"react-dom": "^17.0.1",
"rollup": "^2.36.1",
"rollup-plugin-generate-html-template": "^1.7.0",
"rollup-plugin-includepaths": "^0.2.4",
"rollup-plugin-postcss": "^4.0.0",
"rollup-plugin-scss": "^2.6.1",
"rollup-plugin-uglify": "^6.0.4",
"serve": "^11.3.2"
},
"dependencies": {}
}

目录结构描述

1
2
3
4
5
6
7
8
9
10
11
12
13
14
15
16
17
18
19
20
21
22
├── dist                      
├── es
├── lib
├── example
│ ├── dist
│ ├── src
│ │ ├── components
│ │ ├── index.html
│ │ └── index.js
│ ├── rollup.config.js
├── src
│ ├── styles
│ │ └── index.scss
│ └── index.js
├── README.md // 开发文档
├── .gitignore
├── .babelrc // babel配置
├── .eslintrc // ESLint 配置文件
├── .editorconfig // IDE定义配置
├── package.json // 模块描述文件
├── rollup.config.js // 模块描述文件
└── yarn.lock // 依赖文件

外层rollup.config.js

1
2
3
4
5
6
7
8
9
10
11
12
13
14
15
16
17
18
19
20
21
22
23
24
25
26
27
28
29
30
31
32
33
34
35
36
37
38
39
40
41
42
43
44
45
46
47
48
49
50
51
52
53
54
55
56
57
58
59
60
61
62
63

import resolve from '@rollup/plugin-node-resolve';
import babel from '@rollup/plugin-babel';
import commonjs from '@rollup/plugin-commonjs';
import { uglify } from 'rollup-plugin-uglify';
import replace from '@rollup/plugin-replace';
import postcss from 'rollup-plugin-postcss';
const env = process.env.NODE_ENV;

const config = {
input: 'src/index.js',
//告诉rollup不要将此lodash打包,而作为外部依赖
external: ["react"],
// 是否开启代码分割
experimentalCodeSplitting: true,
output: {
// dir: "lib",
name: 'LuckDraw',
format: 'umd',
sourcemap: true,
globals: {
react: 'React'
},
exports: 'named',
},
plugins: [
resolve(),
babel({
babelHelpers: 'bundled',
exclude: '**/node_modules/**',
}),
commonjs(),
postcss({
minimize: env === 'production',
extract: true,
extensions: ["scss", "less", "css"],
// plugins: [nested(), cssnext({ warnForDuplicates: false }), cssnano()],
// extract: false // 无论是 dev 还是其他环境这个配置项都不做 样式的抽离
}),
],
};


if (env === 'production') {
config.plugins.push(
uglify({
compress: {
pure_getters: true,
unsafe: true,
unsafe_comps: true,
},
warnings: false
})
);

config.plugins.push(
replace({
'process.env.NODE_ENV': JSON.stringify('production')
})
)
}

export default config;

src/index.js

1
2
3
4
5
6
7
8
9
10
11
12
13
14
15
16
17
18
19
20
21
22
23
24
25
26
27
28
29
30
31
32
33
34
35
36
37
38
39
40
41
42
43
44
45
46
47
48
49
50
51
52
53
54
55
56
57
58
59
60
61
62
63
64
65
66
67
68
69
70
71
72
73
74
75
76
77
78
79
80
81
82
83
84
85
86
87
88
89
90
91
92
93
94
95
96
97
98
99
100
101
102
103
104
105
106
107
108
109
110
111
112
113
114
115
116
117
118
119
120
121
122
123
124
125
import React from 'react'
import './styles/index.scss'
class LuckDraw extends React.PureComponent {
constructor(props) {
super(props)
this.state = {
active_index: null, // 奖品是否被选中,选中时,值为奖品index, 例如0,1,2,3...
times: 'times' in props ? props.times * 1 : 1, // 抽奖次数
is_rolling: false, // 正在抽奖时,禁止重复点击
roll_map_list: [0, 1, 2, 7, 8, 3, 6, 5, 4], // 运动顺序,数据映射
};
this.lotteryTimer = null;
this.current_index = 0;
this.CYCLE_TIMES = 0;
this.speed = 50;
}
componentWillUnmount() {
clearTimeout(this.lotteryTimer);
clearTimeout(this.callbacktimer)
}
data_format(data) {
if (data) {
// let gift_list = data.slice(0, 8);
let gift_list = data.slice(0);
gift_list.splice(gift_list.length / 2, 0, {
name: "立即抽奖",
image: "",
id: "",
startBtn: true
})
return gift_list
} else {
console.error('未获取到奖品信息!');
return []
}
}
start = () => {
const { roll_map_list, times } = this.state;
const { gift, giftList, speed = 120, cycle_times = 3 } = this.props
const gift_list = this.data_format(giftList)
this.setState(
{
active_index: this.current_index,
},
() => {
let act_item = gift_list[roll_map_list.indexOf(this.current_index)] || {}
if (this.speed > speed && (act_item.id * 1 === gift.id * 1)) {
clearTimeout(this.lotteryTimer);
this.lotteryTimer = null;
this.CYCLE_TIMES = 0;
this.speed = 50;
this.callbacktimer = setTimeout(() => {
this.setState({ is_rolling: false, times: times - 1 })
this.props.callback && this.props.callback({ ...act_item, ...gift }, this)
}, 500);
return
}
this.current_index = ++this.current_index % gift_list.length;
this.current_index === 0 && this.CYCLE_TIMES++;
this.lotteryTimer = setTimeout(() => {
this.start();
}, this.speed);
if (this.CYCLE_TIMES > cycle_times) this.speed += 10;
}
);
};
reset = () => {
this.setState({
active_index: null,
})
this.lotteryTimer = null;
this.current_index = 0;
this.CYCLE_TIMES = 0;
this.speed = 50;
}
handlePlay = () => {
if (!this.state.times) return this.props.finishCallback && this.props.finishCallback(this);
if (this.state.is_rolling) return;
this.current_index = 0;
this.CYCLE_TIMES = 0;
this.speed = 50;
if (this.props.beforeStart) {
this.props.beforeStart().then(() => {
this.setState({
is_rolling: true,
}, () => {
this.start();
})
})
} else {
this.setState({
is_rolling: true,
}, () => {
this.start();
})
}
};
render() {
const { active_index, roll_map_list } = this.state;
const gift_list = this.data_format(this.props.giftList)
if (gift_list.length < 8) return null;
return (
<div className={`lottery pos-r`}>
<div className={`lottery_content`}>
{gift_list.map((item, index) => {
let content = (
<div key={index} className={`lottery_item ${active_index === roll_map_list[index] ? 'lottery_item-active' : ''}`} >
{item.ele ? item.ele : <div className={`lottery_item_main`}>{item.name}</div>}
</div>
);
if (item.startBtn) {
content = (
<div key={index} className={`lottery_item`} onClick={this.handlePlay} >
{typeof this.props.playBtn === 'object' ? this.props.playBtn : <div className={`lottery_item_main`} >{this.props.playBtn || item.name}</div>}
</div>
);
}
return content;
})}
</div>
</div>
);
}
}
export default LuckDraw

1、rollup-plugin-commonjs这个包一定要引入好,并且注意使用
//告诉rollup不要将此lodash打包,而作为外部依赖,否则会报

不识别或者 React 的Component 各种错

1
2
external: ["react"],//告诉rollup不要将此react打包,而作为外部依赖
commonjs(),

2、npm 和 git 使用共同的 version和 tags
3、npm 发布用下面的,添加包用上面的

1
2
npm set registry https://registry.npm.taobao.org
npm set registry http://registry.npmjs.org

发布到 npm

1
2
3
4
npm login
npm version new-version
npm publish
git push origin --tags

配置.npmignore

如果项目中没有编写 .npmignore 文件,则需要在 package.json 中新增 files 字段,用于申明将要发布到 NPM 的文件。如果省略掉这一项,所有文件包括源代码会被一起上传到 NPM。
本文采用写 .npmignore 文件的方式,实现仅发布打包后的组件代码。 .npmignore 文件的具体内容如下:

指定发布 npm 的时候需要忽略的文件和文件夹

npm 默认不会把 node_modules 发上去

1
2
3
4
config # webpack配置
example # 开发时预览代码
src # 组件源代码目录
.babelrc # babel 配置

vscode命令行打开文件夹

Posted on 2021-02-03 | In IDE , vscode | 0 comments | Visitors:

两种方式:

1、在VSCode 中 打开 Command+Shift + P 输入Shell安装shell command: install code command in PATH

2、在VSCode 中 按F1 输入code 找到shell command: install code command in PATH

1
2
cd <目录> 
code .

vscode插件推荐

Posted on 2021-02-03 | In IDE , vscode | 0 comments | Visitors:

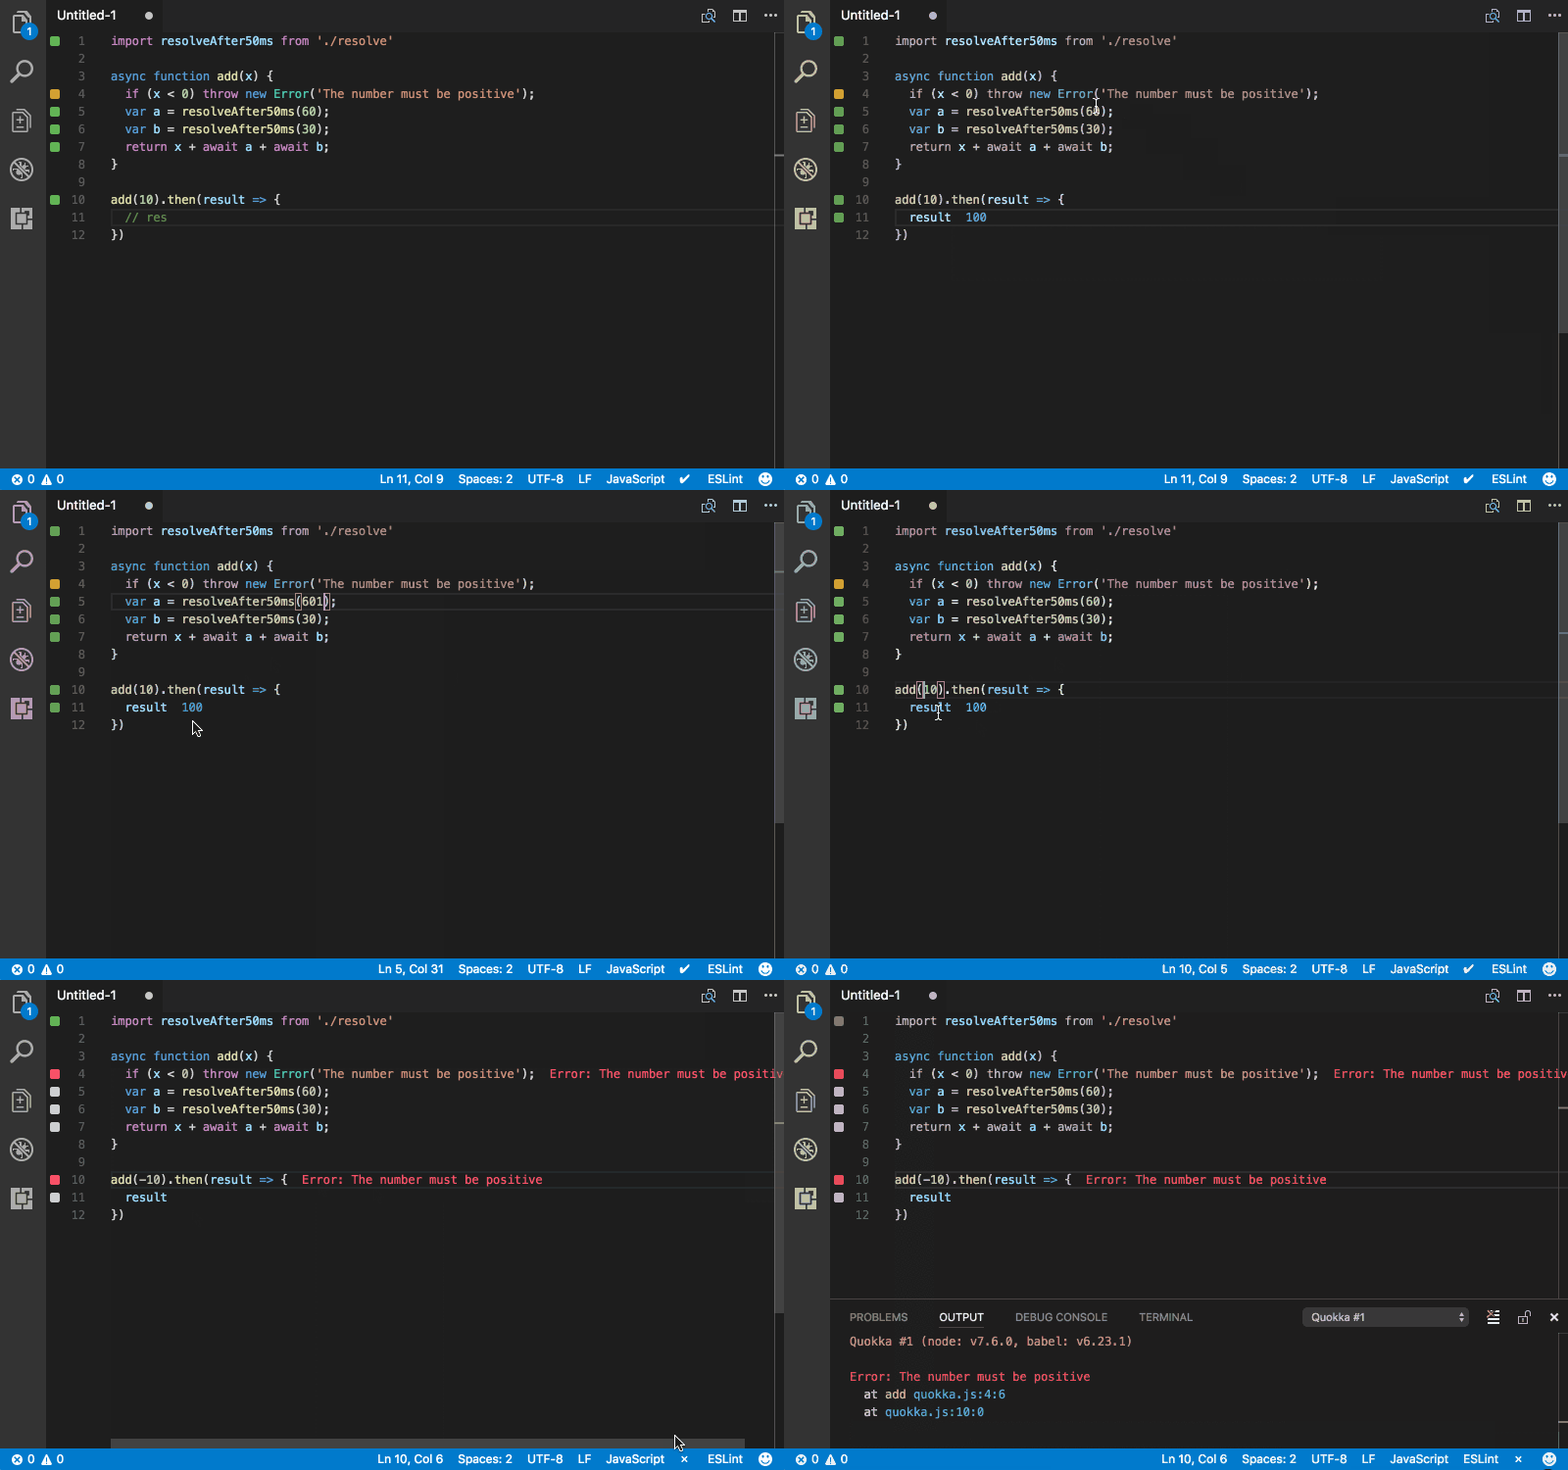
Quokka.js

Quokka.js 会在您键入代码编辑器中显示各种执行结果时立即运行您的代码。支持 JavaScript 和 TypeScript。

image

类似的 Extension:

  • Code Runner  — 支持多种语言例如: C,C++,Java,JavaSript,PHP,Python,Perl,Perl6 等
  • Runner

Bracket Pair Colorizer 和 Indent Rainbow

大部分的语言都需要使用括号,但是括号之间的嵌套会让代码看得很难受。 Bracket Pair Colorizer 和 Indent Rainbow,这两个插件可以让不同缩减的括号显示不同的颜色。

image

使用插件前

image

使用插件后

Snippets

Snippets 是一些常用的代码片段,比如说 import React from 'react'; 这些常用的代码,我们只需要打 imr 然后按下 tab 键就能自动帮我们补全。同样的 clg 会变成 console.log。

一些不错的 extension 有

  • JavaScript (ES6) code snippets
  • React-Native/React/Redux snippets for es6/es7
  • React Standard Style code snippets - Visual Studio Marketplace
  • React Standard Style code snippets - Visual Studio Marketplace

TODO 高亮

通常我们编写代码的时候,会觉得当前实现不优雅,有更好的实现方式。我们会习惯性的加上// TODO: Needs Refactoring 或者其他内容。不过时间久了我们就习得一个技能自动忽略 TODO。 Todo Highlighter 这个插件可以督促你赶紧把这个问题处理了。他会在还有 TODOs / FIXMEs 的地方出现高亮提示。(插件都已经帮到这份上了,之后修行就靠个人了)

image

类似的 Extension:

  • Todo+
  • Todo Parser

成本提示

Import Cost 这个扩展简直惊艳到我了,之前写代码的时候很少有关注导入包的大小。只有在后期优化的时候才考虑这些问题。但是这个插件可以在你导入包的时候就提示这个包有多大。

image

REST 客户端

作为一个 Web 开发,我们经常需要使用 REST API。为了检测 URL 并检测响应,我们一般会使用 Postman 这类工具来测试。但是如果使用了 REST Client 这个插件我们就可以直接在 VSCode 中来测试我们的 API 了。

image

自动补全标签和联动重名标签

在 VSCode 中输入一半的标签会自动帮忙补全另一半,但是如果我后期想修改的话需要就需要两边都要改了。 Auto Close Tag 和 Auto Rename Tag 插件可以很好的解决这个问题。

image

Auto Rename Tag

image

Auto Close Tag

类似的插件:

  • Auto Complete Tag
  • Close HTML/XML tag - Visual Studio Marketplace

GitLens

GitLens 可以增强 VSCode 内置 Git 的功能。例如 commits 搜索,历史记录和显示的代码作者身份具体功能可以查看 Feature List。

image

类似的 Extension:

  • Git History  - 显示提交历史记录的美丽图表等等。推荐。
  • Git Blame  - 它允许您在当前选定行的状态栏中看到 Git Blame 信息。GitLens 也提供了类似的功能。
  • Git Indicators  - 它允许您查看受影响的文件以及状态栏中添加或删除的行数。
  • Open in GitHub / Bitbucket / Gitlab / VisualStudio.com ! - 它允许您使用浏览器中打开具体的 repo。

Git Project Manager

Git Project Manager 允许你直接从 VSCode 窗口打开一个新的窗口。这样我们就可以在 VSCode 中切换仓库了。

在安装这个 插件 后,需要设置 gitProjectManager.baseProjectsFolders 包含我们需要的仓库。

例如 :

1
2
3
4
5
6
{
"gitProjectManager.baseProjectsFolders": [
"/home/user/nodeProjects",
"/home/user/personal/pocs"
]
}

image

类似的 **Extension:**

  • Project Manager

Indenticator

indenticator 可以直观的突出当前的缩进深度。可以容易区分不同层次的缩进。

image

类似的 Extension:

  • Guides
  • Guides - Visual Studio Marketplace

VSCode 图标

可以美化编辑器。

image

类似的 Extension:

  • VSCode Great Icons
  • Studio Icons
  • Studio Icons - Visual Studio Marketplace

Dracula(主题)

我喜欢的一个主题。

image

annotator

WeChatWorkScreenshot_0d5b0dfb-52f3-4bf0-8385-99a7d38aface.png

filesize:文件大小插件

EditorConfig:生成 .editorconfig 配置文件,规定当前编辑器的一些设定。

ESLint:代码质量检查。

styleLint:css代码质量检查。

Prettier:格式化代码

Code Spell Checker:单词拼写检查。

vscode格式化不符合预期

Posted on 2021-02-03 | In IDE , vscode | 0 comments | Visitors:

vscode 的 setting.json

1
2
3
4
5
6
7
8
9
10
11
12
13
14
15
16
17
18
19
20
{
"workbench.colorTheme": "Dracula Soft",
"editor.formatOnSave": true,//保存时使用VSCode 自身格式化程序格式化
"javascript.format.enable": false,//关闭编辑器对 js 文件的格式化,交给 ESLint 来做格式化,否则会格式化两次,解决editor.formatOnSave的兼容问题
"editor.codeActionsOnSave": {
"source.fixAll": true,
// For ESLint
"source.fixAll.eslint": true,
// For TSLint
"source.fixAll.tslint": true,
// For Stylelint
"source.fixAll.stylelint": true
},
"eslint.probe": [
"javascript",
"javascriptreact",
"typescript",
"typescriptreact"
],
}

.editorconfig

1
2
3
4
5
6
7
8
9
10
11
12
13
# http://editorconfig.org
root = true

[*]
indent_style = space
indent_size = 2 # 用两个空格代替制表符;
end_of_line = lf # win用cr lf,linux/unix用lf,mac用cr。统一window和mac
charset = utf-8
trim_trailing_whitespace = true# 在保存时删除尾部的空白字符;
insert_final_newline = true# 在文件结尾添加一个空白行;
max_line_length = 160# 每行代码最大宽度 160
[*.md]
trim_trailing_whitespace = false

从零开始了解babel配置

Posted on 2021-02-03 | In Frontend前端 , babel | 0 comments | Visitors:

什么是Babel

The compiler for writing next generation JavaScript.
官网是这么说的,翻译一下就是下一代JavaScript 语法的编译器。Babel不仅仅是编译代码的工具,还能对代码进行压缩

babel-cli 打包babel6

babel7是@babel/cli

安装

1
yarn add @babel/cli @babel/core -D

执行,打包后的es6语法没有转化

babel是一个编译器(输入源码 => 输出编译后的代码)。就像其他编译器一样,编译过程分为三个阶段:解析、转换和打印输出。

1
"build": "babel src/index.js --out-file dist/index.js"

插件才是编译代码的核心

babel如果没有插件没有办法编译出转化出支持各个浏览器的代码

babel开发者为配置文件提供了多种形式, babel7官方推荐用babel.config.js的形式。也可以用.babelrc, .babelrc.js 或者放到package.json中

插件单个引入
1
2
3
4
@babel/plugin-transform-arrow-functions 转化箭头函数
"plugins":[
"@babel/plugin-transform-arrow-functions"
],

预设preset(插件包)

babel会预先替我们做好了一系列的插件包

1
@babel/preset-env 转化基本语法

@babel/polyfill

es6新增的方法在低版本的游览器无法使用, Babel 所做的只是帮你把ES6 模块化语法转化为CommonJS 模块化语法,其中的 require exports 等是 CommonJS 在具体实现中所提供的变量。

任何实现 CommonJS 规范的环境(如 node 环境)可以直接运行这样的代码,而浏览器环境并没有实现对 CommonJS 规范的支持,所以我们需要使用打包工具(bundler)来进行打包,说的直观一点就是把所有的模块组装起来,为我们的代码做一些包裹,让它能在浏览器端使用。形成一个常规的 js 文件。打包工具有 比如 Browserify, Webpack 等

src/index

1
2
3
4
5
6
7
import '@babel/polyfill'; // 这就是@babel/polyfill的用法

let arrow = () => {
console.log('arrow')
}
let arr = [1, 2, 3]
arr.includes(3)

打包到dist下,require浏览器运行不起来,只能node使用

1
2
3
4
5
"use strict";
require("@babel/polyfill");
var func = function func() {};
var arr = [1, 2, 4];
arr.includes(3);

执行顺序

  • Plugin 会运行在 Preset 之前。
  • Plugin 会从前到后顺序执行。
  • Preset 的顺序则 刚好相反(从后向前)

安装webpack,打包的文件可以在浏览器运行

1
yarn add webpack webpack-cli babel-loader -D

webpack 有 loader 的概念,因此就出现了 babel-loader 和 babel-cli 一样也会读取 .babelrc 或者 package.json 中的 babel 段作为自己的配置,之后的内核处理也是相同。唯一比 babel-cli 复杂的是,它需要和 webpack 交互,因此需要在 webpack 这边进行配置。比较常见的如下:

1
2
3
4
5
6
7
8
9
module: {
rules: [
{
test: /\.js$/,
exclude: /(node_modules)/,
loader: 'babel-loader'
}
]
}

如果想在这里传入 babel 的配置项,也可以把改成:

1
2
3
4
5
6
7
// loader: 'babel-loader' 改成如下:
use: {
loader: 'babel-loader',
options: {
// 配置项在这里
}
}

webpack打包后发现

  • 不压缩代码要261 KiB
  • 压缩代码也只是87.49 KiB
  • 而原始的直接babel编译只要178 bytes

优化 (按需加载)

设置 .babelrc 增加useBuiltIns,useBuiltIns为usage时候必须设置corejs,@babel/polyfill默认会安装 “corejs”: 2

core-js@2 中不支持新的特性了例如Array.prototype.flat()

core-js@3支持很多新特性

1
2
yarn add core-js@3 -D
yarn remove @babel/polyfill
1
2
3
4
5
6
7
8
9
10
11
12
13
14
15
16
17
18
19
{
"presets": [
[
"@babel/preset-env",
{
"targets": {
"browsers": [
"> 1%",
"last 2 versions"
]
},
"useBuiltIns": "usage",
"corejs": 3//默认是2
}
]
]
}

#### 避免编译后的代码中出现重复的帮助程序,有效减少包体积 ,@babel/plugin-transform-runtime 是一个可以重复使用 Babel 注入的帮助程序,以节省代码大小的插件。@babel/plugin-transform-runtime 需要和 @babel/runtime 配合使用

yarn add @babel/plugin-transform-runtime @babel/runtime -D

1
2
```
src/index.js

import bbb from ‘./other’
let arrow = () => {
console.log(‘arrow’)
}
let arr = [1, 2, 3]
arr.includes(3)
bbb()
class App {

}

1
src/other.js

class other{

}

1
2
3
4
5
6
7
8
9
10
11
12
13
14
15
16
编译后的代码,_classCallCheck 这个方法定义了两次。一个 js 文件就定义一次。那项目中有很多文件,岂不是定义很多次。

# Babel7 和 Babel6区别
#### preset 的变更
> 淘汰 es201x,删除 stage-x,强推 env (重点).凡是使用 es201x 的开发者,都应当使用 env 进行替换

为了减少开发者替换配置文件的机械工作,babel 开发了一款 babel-upgrade 的工具,它会检测 babel 配置中的 stage-x 并且替换成对应的 plugins。除此之外它还有其他功能,我们一会儿再详细看。(总之目的就是让你更加平滑地迁移到 babel 7)

#### npm package 名称的变化

这是 babel 7 的一个重大变化,把所有 babel-* 重命名为 @babel/*,例如:

babel-cli 变成了 @babel/cli。
babel-preset-env 变成了 @babel/preset-env。进一步,还可以省略 preset 而简写为 @babel/env。
babel-plugin-transform-arrow-functions 变成了 @babel/plugin-transform-arrow-functions。和 preset 一样,plugin 也可以省略,于是简写为 @babel/transform-arrow-functions。
这个变化不单单应用于 package.json 的依赖中,包括 .babelrc 的配置 (plugins, presets) 也要这么写,为了保持一致。例如

{
“presets”: [

  • “env”
  • “@babel/preset-env”
    ]
    }
    顺带提一句,上面提过的 babel 解析语法的内核 babylon 现在重命名为 @babel/parser,看起来是被收编了。
    

上文提过的 stage-x 被删除了,它包含的插件虽然保留,但也被重命名了。babel 团队希望更明显地区分已经位于规范中的插件 (如 es2015 的 babel-plugin-transform-arrow-functions) 和仅仅位于草案中的插件 (如 stage-0 的 @babel/plugin-proposal-function-bind)。方式就是在名字中增加 proposal,所有包含在 stage-x 的转译插件都使用了这个前缀,语法插件不在其列。

最后,如果插件名称中包含了规范名称 (-es2015-, -es3- 之类的),一律删除。例如 babel-plugin-transform-es2015-classes 变成了 @babel/plugin-transform-classes。(这个插件我自己没有单独用过,惭愧)

不再支持低版本 node

babel 7.0 开始不再支持 nodejs 0.10, 0.12, 4, 5 这四个版本,相当于要求 nodejs >= 6 (当前 nodejs LTS 是 8)。

这里的不再支持,指的是在这些低版本 node 环境中不能使用 babel 转译代码,但 babel 转译后的代码依然能在这些环境上运行,这点不要混淆。

only 和 ignore 匹配规则的变化

在 babel 6 时,ignore 选项如果包含 .foo.js,实际上的含义 (转化为 glob) 是 ./**/.foo.js,也就是当前目录 包括子目录 的所有 foo.js 结尾的文件。这可能和开发者常规的认识有悖。

于是在 babel 7,相同的表达式 .foo.js 只作用于当前目录,不作用于子目录。如果依然想作用于子目录的,就要按照 glob 的完整规范书写为 ./**/.foo.js 才可以。only 也是相同。

这个规则变化只作用于通配符,不作用于路径。所以 node_modules 依然包含所有它的子目录,而不单单只有一层。

@babel/node 从 @babel/cli 中独立了

和 babel 6 不同,如果要使用 @babel/node,就必须单独安装,并添加到依赖中。

babel-upgrade

在提到删除 stage-x 时候提过这个工具,它的目的是帮助用户自动化地从 babel 6 升级到 7。

这款升级工具的功能包括:(这里并不列出完整列表,只列出比较重要和常用的内容)

package.json

把依赖(和开发依赖)中所有的 babel-* 替换为 @babel/*
把这些 @babel/* 依赖的版本更新为最新版 (例如 ^7.0.0)
如果 scripts 中有使用 babel-node,自动添加 @babel/node 为开发依赖
如果有 babel 配置项,检查其中的 plugins 和 presets,把短名 (env) 替换为完整的名字 (@babel/preset-env)
.babelrc
检查其中的 plugins 和 presets,把短名 (env) 替换为完整的名字 (@babel/preset-env)
检查是否包含 preset-stage-x,如有替换为对应的插件并添加到 plugins
使用方式如下:

不安装到本地而是直接运行命令,npm 的新功能

npx babel-upgrade –write

或者常规方式

npm i babel-upgrade -g
babel-upgrade –write
babel-upgrade 工具本身也还在开发中,还列出了许多 TODO 没有完成,因此之后的功能可能会更加丰富,例如上面提过的 ignore 的通配符转化等等。

模块化发展

Posted on 2021-02-03 | In Frontend前端 , 模块化 | 0 comments | Visitors:

什么是模块?

模块化是一种解决问题的方案,一个模块就是实现某种特定功能的文件,可以帮助开发者拆分和组织代码。

  • 将一个复杂的程序依据一定的规则(规范)封装成几个块(文件), 并进行组合在一起
  • 块的内部数据与实现是私有的, 只是向外部暴露一些接口(方法)与外部其它模块通信

    js模块化


JavaScript语言在设计之初只是为了完成简单的功能,因此没有模块化的设计。但是随着前端应用的越来越庞大,模块化成为了js语言必须解决的问题。

模块化发展

js的模块化发展大致可以划分为五个阶段:

  • 1、文件划分全局function模式 : 将不同的功能封装成不同的全局函数

    文件划分方式无法管理模块的依赖关系(不是强制定义模块依赖),而且模块内所有变量都挂载在全局对象上,容易污染全局作用域,命名冲突。

按照js文件划分模块,一个文件可以认为是一个模块,然后将文件通过script标签的方式引入。
编写模块:foo.js

1
2
3
4
var foo = 'foo'
function sayHello() {
console.log(foo)
}

使用模块:

1
2
3
4
5
6
7
8
9
10
11
<html>
<header></header>
<body>
<!--先引用-->
<script src="./foo.js"></script>
<script>
// 通过全局对象调用
window.sayHello()
</script>
</body>
</html>
  • 2、命名空间namespace模式 : 简单对象封装

    使用命名空间的好处是可以尽量避免命名冲突,但是由于命名空间挂载在全局对象下,依然能够在外部修改模块的变量(没有实现模块私有化)。
    将文件内所有的变量都添加到一个命名空间下。
    编写模块:

    1
    2
    3
    4
    5
    6
    var FooModule = {
    foo: 'foo',
    sayHello() {
    console.log(FooModule.foo)
    }
    }

    使用模块:

    1
    2
    3
    4
    <script>
    // 通过命名空间调用
    FooModule.sayHello()
    </script>
  • 3、立即执行函数IIFE模式:匿名函数自调用(闭包)

    作用: 数据是私有的, 外部只能通过暴露的方法操作
    编码: 将数据和行为封装到一个函数内部, 通过给window添加属性来向外暴露接口
    问题: 如果当前这个模块依赖另一个模块怎么办?

编写模块:

1
2
3
4
5
6
7
8
9
10
11
12
13
14
15
16
17
18
19
(function(window) {
let data = 'www.baidu.com'
//操作数据的函数
function foo() {
//用于暴露有函数
console.log(`foo() ${data}`)
}
function bar() {
//用于暴露有函数
console.log(`bar() ${data}`)
otherFun() //内部调用
}
function otherFun() {
//内部私有的函数
console.log('otherFun()')
}
//暴露行为
window.myModule = { foo, bar } //ES6写法
})(window)

使用模块:

1
2
3
4
<script>
// 通过命名空间调用
window.foo()
</script>
  • 4、IIFE模式增强 : 引入依赖

    这就是现代模块实现的基石

    1
    2
    3
    4
    5
    6
    7
    8
    9
    10
    11
    12
    13
    14
    15
    16
    17
    18
    19
    20
    21
    // module.js文件
    (function(window, $) {
    let data = 'www.baidu.com'
    //操作数据的函数
    function foo() {
    //用于暴露有函数
    console.log(`foo() ${data}`)
    $('body').css('background', 'red')
    }
    function bar() {
    //用于暴露有函数
    console.log(`bar() ${data}`)
    otherFun() //内部调用
    }
    function otherFun() {
    //内部私有的函数
    console.log('otherFun()')
    }
    //暴露行为
    window.myModule = { foo, bar }
    })(window, jQuery)

    // index.html文件

    1
    2
    3
    4
    5
    6
    7

    <!-- 引入的js必须有一定顺序 -->
    <script type="text/javascript" src="jquery-1.10.1.js"></script>
    <script type="text/javascript" src="module.js"></script>
    <script type="text/javascript">
    myModule.foo()
    </script>

    模块化的好处

  • 避免命名冲突(减少命名空间污染)

  • 更好的分离, 按需加载

  • 更高复用性

  • 高可维护性

引入多个script后出现出现问题

  • 请求过多

  • 首先我们要依赖多个模块,那样就会发送多个请求,导致请求过多

  • 依赖模糊

  • 我们不知道他们的具体依赖关系是什么,也就是说很容易因为不了解他们之间的依赖关系导致加载先后顺序出错。

  • 难以维护

以上两种原因就导致了很难维护,很可能出现牵一发而动全身的情况导致项目出现严重的问题。
模块化固然有多个好处,然而一个页面需要引入多个js文件,就会出现以上这些问题。而这些问题可以通过模块化规范来解决,下面介绍开发中最流行的commonjs, AMD, ES6, CMD规范。

  • 5、模块化规范

    ES2015提出了标准模块化规范,即ES Modules。它包含一个模块化标准和一个模块加载器。

编写模块

// moduleA.js

1
export const foo = 'foo'

// moduleB.js

1
2
3
// 会自动从服务器下载moduleA.js文件
import { foo } from './moduleA.js'
console.log(foo)

使用模块

1
2
3
4
5
6
7
<html>
<header></header>
<body>
<!--引入moduleB.js-->
<script type="module" src="./moduleB.js"></script>
</body>
</html>

注意事项:
引入模块js时,必须添加type=module
由于模块会自动下载依赖文件,因此html文件必须挂载到服务器下,直接文件浏览会报错。

模块化规范

Posted on 2021-02-03 | In Frontend前端 , 模块化 | 0 comments | Visitors:

前端模块化:CommonJS,AMD,CMD,ES6

模块化就是将一个复杂的系统分解成多个独立的模块的代码组织方式。
在很长的一段时间里,前端只能通过一系列的script标签来维护我们的代码关系,但是一旦我们的项目复杂度提高的时候,这种简陋的代码组织方式便是如噩梦般使得我们的代码变得混乱不堪。所以,在开发大型Javascript应用程序的时候,就必须引入模块化机制。
由于早期官方并没有提供统一的模块化解决方案,所以在群雄争霸的年代,各种前端模块化方案层出不穷。前端模块化发展之路:IIFE(自执行函数)>>AMD(RequireJS实现)>>CMD(SeaJS实现)>>CommonJS(NodeJs)>>ES6 Modules(模块化直接成为了Javascript语言规范中的一部分)

image.png

CommonJS

是运行时加载,运行时才把模块挂载在exports之上(加载整个模块的所有),加载模块其实就是查找对象属性。

Node.js是commonJS规范的主要实践者,它有四个重要的环境变量为模块化的实现提供支持:module、exports、require、global。实际使用时,用module.exports定义当前模块对外输出的接口(不推荐直接用exports),用require加载模块。commonJS用同步的方式加载模块。在服务端,模块文件都存在本地磁盘,读取非常快,所以这样做不会有问题。但是在浏览器端,限于网络原因,更合理的方案是使用异步加载。

1
2
3
4
5
6
7
8
9
10
11
12
13
// 定义模块math.js
var basicNum = 0;
function add(a, b) {
return a + b;
}
module.exports = { //在这里写上需要向外暴露的函数、变量
add: add,
basicNum: basicNum
}

// 引用自定义的模块时,参数包含路径,可省略.js
var math = require('./math');
math.add(2, 5);

AMD和require.js

AMD规范采用异步方式加载模块,模块的加载不影响它后面语句的运行。所有依赖这个模块的语句,都定义在一个回调函数中,等到加载完成之后,这个回调函数才会运行。这里介绍用require.js实现AMD规范的模块化:用require.config()指定引用路径等,用define()定义模块,用require()加载模块。
首先我们需要引入require.js文件和一个入口文件main.js。main.js中配置require.config()并规定项目中用到的基础模块。require.js在申明依赖的模块时会在第一之间加载并执行模块内的代码

1
2
3
4
5
6
7
8
9
10
11
12
13
14
15
16
/** 网页中引入require.js及main.js **/
<script src="js/require.js" data-main="js/main"></script>

/** main.js 入口文件/主模块 **/
// 首先用config()指定各模块路径和引用名
require.config({
baseUrl: "js/lib",
paths: {
"jquery": "jquery.min", //实际路径为js/lib/jquery.min.js
"underscore": "underscore.min",
}
});
// 执行基本操作
require(["jquery","underscore"],function($,_){
// some code here
});

UMD

UMD 本质上是兼容 CommonJS 与 AMD 这两种规范的代码语法糖,通过判断执行上下文中是否包含 define 或 module 来包装模块代码,适用于需要跨前后端的模块。
UMD(Universal Module Definition)是AMD和CommonJS的糅合,跨平台的解决方案。

AMD模块以浏览器第一的原则发展,异步加载模块。
CommonJS模块以服务器第一原则发展,选择同步加载,它的模块无需包装(unwrapped modules)。
UMD先判断是否支持Node.js的模块(exports)是否存在,存在则使用Node.js模块模式。再判断是否支持AMD(define是否存在),存在则使用AMD方式加载模块。

CMD和sea.js

CMD是另一种js模块化方案,它与AMD很类似,不同点在于:AMD 推崇依赖前置、提前执行,CMD推崇依赖就近、延迟执行。此规范其实是在sea.js推广过程中产生的。

1
2
3
4
5
6
7
8
9
/** CMD写法 **/
define(function(require, exports, module) {
var a = require('./a'); //在需要时申明
a.doSomething();
if (false) {
var b = require('./b');
b.doSomething();
}
});

ES6 Module

此法为编译时加载,编译时遇到import就会生成一个只读引用。等到运行时就会根据此引用去被加载的模块取值。所以不会加载模块所有方法,仅取所需。

ES6 在语言标准的层面上,实现了模块功能,而且实现得相当简单,旨在成为浏览器和服务器通用的模块解决方案。其模块功能主要由两个命令构成:export和import。export命令用于规定模块的对外接口,import命令用于输入其他模块提供的功能。

1
2
3
4
5
6
/** 定义模块 math.js **/
var basicNum = 0;
var add = function (a, b) {
return a + b;
};
export { basicNum, add };

模块引用:通过 import 关键字引用其他模块。引用方式分为静态引用和动态引用。静态引用格式为import importClause from ModuleSpecifier,import 表达式需要写在文件最外层上下文中;动态引用的方式则是 import(),返回 promise 对象。

1
2
3
4
5
/** 引用模块 **/
import { basicNum, add } from './math';
function test(ele) {
ele.textContent = add(99 + basicNum);
}

如上例所示,使用import命令的时候,用户需要知道所要加载的变量名或函数名。其实ES6还提供了export default命令,为模块指定默认输出,对应的import语句不需要使用大括号。这也更趋近于ADM的引用写法。

1
2
3
4
5
6
7
8
/** export default **/
//定义输出
export default { basicNum, add };
//引入
import math from './math';
function test(ele) {
ele.textContent = math.add(99 + math.basicNum);
}

复制代码ES6的模块不是对象,import命令会被 JavaScript 引擎静态分析,在编译时就引入模块代码,而不是在代码运行时加载,所以无法实现条件加载。也正因为这个,使得静态分析成为可能。

五、 ES6 模块与 CommonJS 模块的差异

  1. CommonJS 模块输出的是一个值的拷贝,ES6 模块输出的是值的引用。
    CommonJS 模块输出的是值的拷贝,也就是说,一旦输出一个值,模块内部的变化就影响不到这个值。
    ES6 模块的运行机制与 CommonJS 不一样。JS 引擎对脚本静态分析的时候,遇到模块加载命令import,就会生成一个只读引用。等到脚本真正执行时,再根据这个只读引用,到被加载的那个模块里面去取值。换句话说,ES6 的import有点像 Unix 系统的“符号连接”,原始值变了,import加载的值也会跟着变。因此,ES6 模块是动态引用,并且不会缓存值,模块里面的变量绑定其所在的模块。
  2. CommonJS 模块是运行时加载,ES6 模块是编译时输出接口。

运行时加载: CommonJS 模块就是对象;即在输入时是先加载整个模块,生成一个对象,然后再从这个对象上面读取方法,这种加载称为“运行时加载”。

编译时加载: ES6 模块不是对象,而是通过 export 命令显式指定输出的代码,import时采用静态命令的形式。即在import时可以指定加载某个输出值,而不是加载整个模块,这种加载称为“编译时加载”。

CommonJS 加载的是一个对象(即module.exports属性),该对象只有在脚本运行完才会生成。而 ES6 模块不是对象,它的对外接口只是一种静态定义,在代码静态解析阶段就会生成。

注意

CommonJS与AMD/CMD:

  • AMD/CMD是CommonJS在浏览器端的解决方案。
  • CommonJS是同步加载(代码在本地,加载时间基本等于硬盘读取时间)。
  • AMD/CMD是异步加载(浏览器必须这么做,代码在服务端)

stylelint-css代码格式化

Posted on 2021-02-03 | In Frontend前端 , stylelint | 0 comments | Visitors:

stylelint:** stylelint 是一个强大和现代的 CSS 审查工具,有助于开发者推行统一的代码规范,避免样式错误stylelint拥有超过150条的规则,包括捕捉错误、最佳实践、控制可以使用的语言特性和强制代码风格规范。。stylelint 由 PostCSS 提供技术支持,所以它也可以理解 PostCSS 解析的语法,比如 SCSS。

命令

1
stylelint --fix src/**/*.{html,css,scss}

插件:

  • stylelint-config-prettier:禁用所有与格式相关的 Stylelint 规则,解决 prettier 与 stylelint 规则冲突,确保将其放在 extends 队列最后,这样它将覆盖其他配置。
  • stylelint-config-standard:官网提供的 css 标准
  • stylelint-prettier:基于 prettier 代码风格的 stylelint 规则
  • stylelint-config-recess-order: 属性排列顺序

stylelint配置(官方)

  • extends:可指定继承指定的配置规则;您可以继承现有配置的数组,数组中的每个项都优先于前一项
    例如:继承 stylelint-config-standard,myExtendableConfig 覆盖stylelint-config-standard,然后自定义覆盖缩进规则:

    1
    2
    3
    4
    5
    6
    7
    8
    9
    {
    "extends": [
    "stylelint-config-standard",
    "./myExtendableConfig"
    ],
    "rules": {
    "indentation": "tab"
    }
    }
  • plugins 数组,一旦声明了插件,在您的 “rules” 对象中,您需要为插件的规则添加选项,就像任何标准规则一样。“插件”可以提供单个规则或规则集。如果您使用的插件提供规则集,只需在 “plugins” 配置中调用该模块,并在”rules”中使用它提供的规则。例如:

    1
    2
    3
    4
    5
    6
    7
    8
    9
    10
    {
    "plugins": [
    "../some-rule-set.js"
    ],
    "rules": {
    "some-rule-set/first-rule": "everything",
    "some-rule-set/second-rule": "nothing",
    "some-rule-set/third-rule": "everything"
    }
    }
  • ignoreFiles

  • defaultSeverity:未在辅助选项中指定严重性的所有规则的默认严重性级别。severity 的可用值是”warning””error”

  • .stylelintignore

  • rules

  • stylelint-config-standard: 官网提供的 css 标准

  • stylelint-config-recess-order: 属性排列顺序

  • stylelint-prettier: 基于 prettier 代码风格的 stylelint 规则

  • stylelint-config-prettier: 禁用所有与格式相关的 Stylelint 规则,解决 prettier 与 stylelint 规则冲突,确保将其放在 extends 队列最后,这样它将覆盖其他配置。

项目增加stylelint

1
yarn add stylelint stylelint-config-standard stylelint-config-rational-order stylelint-prettier stylelint-config-prettier -D

.stylelintrc

1
2
3
4
5
6
7
8
9
10
11
12
13
14
15
16
17
18
19
20
21
22
23
24
25
26
27
28
29
30
31
{
"defaultSeverity": "error",
"extends": [
"stylelint-config-recommended",
"stylelint-config-standard",
"stylelint-prettier/recommended",
],
"rules": {
"selector-pseudo-class-no-unknown": [true, {
ignorePseudoClasses: ["global"] //.module.scss
}],
"length-zero-no-unit": null,//单位可以有0
"indentation": 2,
"max-empty-lines": 1,
"block-no-empty": true,
"block-opening-brace-newline-after": "always-multi-line",
"block-opening-brace-space-after": "always-single-line",
"block-opening-brace-space-before": "always",
"block-closing-brace-empty-line-before": "never",
"declaration-empty-line-before": "never",
"declaration-block-no-duplicate-properties": true,
"declaration-block-no-redundant-longhand-properties": true,
"shorthand-property-no-redundant-values": true,
"no-empty-source": true,
"no-eol-whitespace": true,
"no-extra-semicolons": true,
"no-invalid-double-slash-comments": true,
"no-missing-end-of-source-newline": true,
"at-rule-no-unknown": null,
},
}

stylelint-prettier Recommended Configuration

1
npm install --save-dev stylelint-config-prettier stylelint-prettier prettier

.stylelintrc

1
2
3
{
"extends": ["stylelint-prettier/recommended"]
}

his does three things:
1、Enables the stylelint-plugin-prettier plugin.
2、Enables the prettier/prettier rule.
3、Extends the stylelint-config-prettier configuration.

12…4>
Amy Chen

Amy Chen

All problems in computer science can be solved by another level of indirection. -by David John Wheeler

36 posts
28 categories
31 tags
RSS
GitHub E-Mail Skype 简书
© 2021 Amy Chen
Powered by Hexo
|
Theme — NexT.Pisces v5.1.4